Grid Mapping for Unity
Copyright (c) 2012-2025, Codefarts
All rights reserved.
contact@codefarts.com
http://www.codefarts.com/GridMapping/
Grid Mapping is a in editor tool for unity that assists you in the creation of worlds that are based around a grid.
NOTE: The current version of this tool does not contain a grid or tile mapping/management system. It is a in-editor creation tool only. Version 2 introduces some preliminary editor & runtime management API's via C# extension methods.


Some screen shots use tile sets from Ari Feldman's SpriteLib (Common Public License) and are not included with this package.
http://www.widgetworx.com/widgetworx/portfolio/spritelib.html
If you are interested in what future features are in the works check out the http://www.codefarts.com/ website for additional information.
Table of Contents
- Before Installing
- First time use
- Mac OSX Users
- Included assets
- Using the included assets
- Creating a map
- Changing map properties
- Map layers
- Drawing helpers
- Drawing Tools
- Selecting prefabs
- Selecting a material
- Changing rotation
- Customizing the prefab list
- Understanding the naming convention
- Settings
- *BETA* Automatic Material Creation
- *BETA* Drawing Rules Editor
- Prefab Index File Generator
- Bug Reporting
- Known Issues
- Concerns
- Version Notes
- Attribution
Before Installing [ Top ]
IMPORTANT: Read this section in full before attempting to follow the installation instructions.
Before installing Grid Mapping it is recommended that you remove the "Codefarts Game\Grid Mapping" & "Codefarts Game\CoreProjectCode" folder(s).
NOTE: If you have a older version of Grid Mapping you may need to remove the "CBX Game\CBX.GridMapping" & "CBX Game\CBX.CoreProjectCode" folder(s). (See version 2.0.3 Version Notes)
NOTICE: Removing the "CBX Game\CBX.CoreProjectCode" or "Codefarts Game\CoreProjectCode" folders may cause other Codefart tools to stop working!
The purpose of the "Codefarts Game\CoreProjectCode" folder is that it contains a core set of project files relating to settings, localization & integration with Unity's Preferences window. Most if not all tools provided by Codefarts will include a "Codefarts Game\CoreProjectCode" folder so removing it may cause other Codefart tools to stop working.
An example is provided below ...
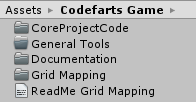
The image above shows two tools installed in the project. Grid Mapping & General Tools. Both these tools share a common code base found in the CoreProjectCode folder.
If you wish to install a new version of Grid Mapping you can safely remove the "Codefarts Game\Grid Mapping" & "Codefarts Game\CoreProjectCode" folders and install the new version.
*BUT* If you remove the "Codefarts Game\Grid Mapping" & "Codefarts Game\CoreProjectCode" folders and do not install a new version of Grid Mapping the "General Tools" tool (from the image above) will stop working properly because it too also depends on the "Codefarts Game\CoreProjectCode" folder being present.
So the only time you should be concerned about removing the "Codefarts Game\CoreProjectCode" folder is when there appears to be more then one Codefarts tool installed in your project and you are removing a Codefarts tool without intending to install a new version.
Version 2.1.0 setting changes [ Top ]
With the release of v2.1.0 the way Grid Mapping saves it's settings has changed slightly. See Version Notes.
After upgrading to v2.1.0 all of the Grid Mapping settings may change to there default values. But your original settings should remain stored in the xml settings file you specified under "Edit->Preferences->Codefarts->Settings File".
If you wish you can get your hands dirty by editing the xml settings file by remove all "CBX." prefixes from the entry elements by hand. Changing "<entry key="CBX.GridMapping" to "<entry key="GridMapping" for example.
First time use [ Top ]
Upon installation you may get a popup dialog stating "No settings file exists! Click "Edit->Preferences" and select "Codefarts" to setup a settings file." Click OK and then open the unity preferences dialog by clicking "Edit->Preferences" then select "Codefarts" from the left hand column of categories.
Follow the instructions and click the "..." button to specify the location where to create a new settings file.
This is a one time process, unless the settings file is moved or deleted. If you don't perform this step the tools may not work properly and you will have errors being displayed in the unity console window.
Grid Mapping uses a core set of code files found in the "Codefarts Game\CoreProjectCode" folder that provides a integrated settings system as well as loading and managing localization strings.
Mac OSX Users [ Top ]
There may be lingering bugs for Mac OS users. I do not have access to a copy of OSX but I am resonably quick to respond with fixes. Try the in editor feed back window or send a email with any issue you may have to contact@codefarts.com
Included assets [ Top ]
Grid Mapping includes a simple tile set texture and materials found in the "Codefarts Game\Grid Mapping\Textures" & "Codefarts Game\Grid Mapping\Materials" folders.
Grid Mapping also comes with a sample scenes that can be found in the "Codefarts Game\Grid Mapping\Scenes" folder. If you are using Unity version 4.x or earlier the "PromoScene" requires you to import the CharacterController asset by clicking "Assets->Import Package->Character controller". If you are using Unity 5.x or later you will need to import the "Cameras" & "Characters" assets via "Assets->Import Package->Cameras" & "Assets->Import Package->Characters".
All the code for Grid Mapping can be found under the "Codefarts Game\Grid Mapping\Code" folder.
Using the included assets [ Top ]
It is recommended that if you wish to use the included prefabs found in the "Codefarts Game\Grid Mapping\Resources\Codefarts.Unity\Prefabs" folder you should copy them to some other location in your project other then the "Codefarts Game" folder.
The reason for this is that if you download a new version of Grid Mapping your scenes may become corrupted because of changes that may have occurred to the prefabs.
It's always a safe practice to copy assets from a tools folder into a custom project folder that you control to prevent version changes from breaking your scenes.
Creating a map [ Top ]
To add a grid map to the scene click "Game Object->Create Other->Create New Grid Map"
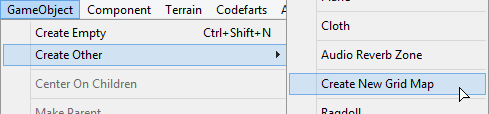
Alternatively you can create a new game object and add the "Grid Map" MonoBehavior found in "Codefarts Game\Grid Mapping\Code\GridMap.cs".
Changing map properties [ Top ]
When the map is selected it will show a series of properties in the inspector window.
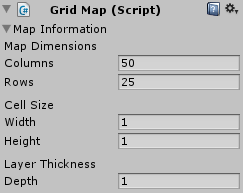
- "Map Dimensions" - Allows you to specify size of the map in Columns & Rows.
- "Cell Size" - Allows you to specify the size of each cell.
- "Layer Thickness" - Defines how far the layers are separated from each other.
NOTE: Changing "Cell Size" or "Layer Thickness" values after prefabs have been drawn on the map will not automatically scale the prefabs to match the new values. That feature will be included in a future update.
Map Layers [ Top ]
Old style map layers (Before version 2)
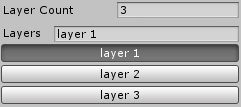
You can set the number of map layers by changing the value of the "Layer Count" field. There must be a minimum of one layer.
To change the name of a layer click the button for the layer and type a layer name in the "Layers" field.
Clicking on a layer makes it the active layer and drawing on the map will draw onto that selected layer.
Version 2 style map layers
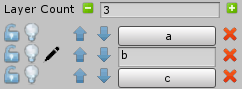
Click the add and subtract layer buttons on either side of the "Layer Count" field to add or remove layers from the bottom of the layer list.
The lock icon indicates whether the layer has been locked. Locked layers cannot be deleted or edited. Clicking the lock icon will toggle it between locked and unlocked.
The circle with a dot in the center indicates whether the layer is visible or not. Clicking the visible icon will toggle whether or not the layer is visible.
NOTE: Layers consist of prefabs objects in the scene. When a layer is made visible the "Active" state for all prefabs on that layer is set to true. When the layer visibility is toggled off all the prefabs on that layer have there active state set to false.
The pencil icon indicates the current active layer that is being edited.
The Up and Down arrow buttons are used to move a layer and all the layers prefabs up or down the layer list. This allows you to rearrange the order of layers in the list.
An active layer will show a text field where you can provide a name for the layer. Layers that are not the currently active layer are displayed as buttons. Click a layers button to make that layer the currently active layer.
The delete icon when clicked will delete the layer and any prefabs that belong to that layer. Depending on how the user has setup layer settings they may be prompted with a confirmation dialog before the layer is deleted.
Drawing Helpers [ Top ]
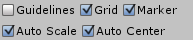

There are five drawing helpers that assist in the creation of maps.
-
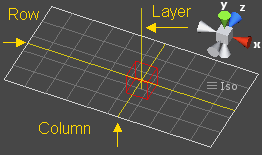
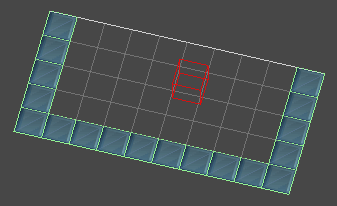
"Guidelines" - If checked will draw a line extending from the current marker position. Lines are drawn along the Column, Row, & number of Layers.
-
"Grid" - If checked will draw a grid for the currently selected layer and show the Column & Rows.
- "Auto Scale" - If checked prefabs that are drawn will automatically be scaled to fit within the maps "Cell Size".
- "Auto Center" - If checked prefabs that are drawn will automatically be adjusted to be centered within the map cell.
How does "Auto Scale" work?
When "Auto Scale" is checked the system only factors in the X & Z size of the prefab when determining how much to scale it.
NOTE: This can lead to issues if the prefab you are drawing is very tall along the Y axis or taller then the maps "Layer Thickness" value.
How does "Auto Center" work?
Sometimes a prefab's local pivot point will not be exactly centered to the object. If you are drawing a prefab and that prefab is being drawn with an offset check 'Auto Center' and redraw the prefab.
Auto centering takes into account the bounding box of the objects renderer and the local scale. It then adjusts the position of the prefab so that the center of the map cell and the center of the prefab's bounding box are properly aligned.
Drawing Tools [ Top ]
There are numerous drawing tools that assist in the creation of maps. Use left mouse button to draw and right mouse button to erase.
Depending on what settings are checked you may need to hold one or more of the Shift, Alt & Control buttons while drawing or erasing.
-

"Pencil" - If checked will draw or erase a single prefab at the current marker position. When selected drawing rules are available under the drawing tool buttons. -


"Rectangle" - If checked will draw or erase a rectangle of prefabs. Hold down the mouse button and drag to position and size the rectangle. When selected a toggle button becomes available under the drawing tools called "Fill" Select this to draw a filled rectangle. The drawing tool icon for the button will also update to indicate you are drawing a filled rectangle. -

"Picker" - If checked will allow you to click on an area of the map and pick a prefab making it the prefab that will be used when next time drawing occurs. NOTE: Only picks the source prefab. -

Allows you to click on a prefab on the map and get information about that prefab displayed in the console window.
Drawing Rules [ Top ]
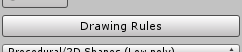
Grid Mapping also allows you to attach drawing rules to the grid map. Drawing rules are only availible when the "Pencil" tool is selected. Click the drawing Rules button under the drawing tool buttons to display the list of attached drawing rules. Click it again to hide the drawing rules list.
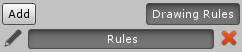
When you click the drawing rules button it will shrink off the the right side and a new "Add" button will appear to the left.
Click the Add button to select and attach a xml drawing rule file to the map.
You can enable or disable the rule by clicking the rule in the rule list. Only Enabled rules will be applied when drawing.

Click the pencil icon to the left of the rule to open and edit the rule set in the Drawing Rules Editor.
Click the "X" button to the right of the rule to remove the rule from the list.
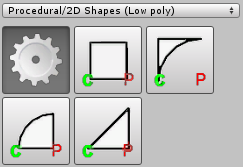
Selecting prefabs [ Top ]
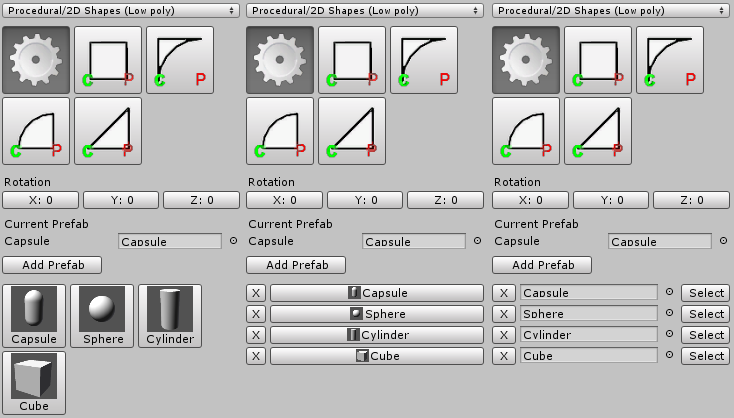
Prefabs are organized into categories. The drop down menu just above the Gear icon
![]() contains a list of available categories and sub categories that you can choose from.
contains a list of available categories and sub categories that you can choose from.
Before you begin drawing you must select a prefab to use.
Selecting the Gear icon
![]() allows you to select a prefab that is not otherwise available in the quick prefab selection grid.
allows you to select a prefab that is not otherwise available in the quick prefab selection grid.
To select a prefab click the prefab selection field under "Current Prefab" to bring up the asset browser window. Every time you select a prefab in the asset browser a list of recently selected prefabs will appear under the "Add Prefab" button.
To remove a prefab from the recently selected prefab list click the "X" button to the left. To select a recently used prefab and use it for drawing click the button to the right to make it the current prefab.
If you want to add additional slots to the recently used prefabs list you can click the "Add Prefab" button and it will add a new empty entry to the list.
Selecting a material [ Top ]
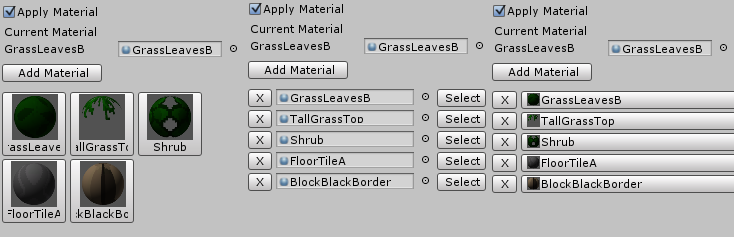
When drawing a prefab from the quick prefab selection list you can also choose a material to be applied to the prefab when it is drawn.
The material will only be applied if the "Apply Material" check box is checked. The "Current Material" does not get applied to prefabs if you are drawing with the Gear icon
![]() .
.
To select a material click the material selection field under "Current Material" to bring up the asset browser window. Every time you select a material in the asset browser a list of recently selected materials will appear under the "Add Material" button.
To remove a material from the recently selected material list click the "X" button to the left. To select a recently used material and use it for drawing click the button to the right to make it the current material .
If you want to add additional slots to the recently used material list you can click the "Add Material" button and it will add a new empty entry to the list.
Changing rotation [ Top ]

If the prefab you are drawing is not oriented properly you can click one of the rotation buttons. The three buttons correspond to the X, Y, Z rotation.
When you click a rotation button a grid of preset rotation values will appear.
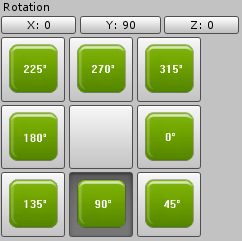
Click a rotation value from the grid to set the rotation. To cancel selection and close the selection grid you can click the center square or you can click the rotation button again.
Rotation grids are color coded to match the color of unity's axis. Red for the X axis, green for the Y axis, and blue for the Z axis.
Customizing the prefab list [ Top ]
You can customize the quick prefab selection grid by placing specially formatted *.txt files in the "Resources/Codefarts.Unity/GridMappingPrefabIndexFiles" folder. The *.txt files can have any filename but they must reside in a "Resources/Codefarts.Unity/GridMappingPrefabIndexFiles" folder for Grid Mapping to find them. Read more about how resource folders work in the Unity documentation here.
// Source asset, texture icon, name
// separator ,
Codefarts.Unity/Prefabs/Plane, Codefarts.Unity/Textures/2D 2 Poly Plane, Plane
Codefarts.Unity/Prefabs/CornerRamp, Codefarts.Unity/Textures/CornerRamp, CornerRamp
Codefarts.Unity/Prefabs/Ramp, Codefarts.Unity/Textures/Ramp, Ramp
Each line defines a new entry.
<PrefabResource>, <TextureResource>, <Name>
-
<PrefabResource>
A resources folder path to a prefab asset without the file extension. -
<TextureResource>
A resources folder path to a texture asset without the file extension. This is optional and if not included Grid Mapping will use AssetPreview.GetAssetPreview as the texture. Be aware that not all prefabs will have a texture if AssetPreview.GetAssetPreview is used. -
<Name>
Defines the name that the prefab will have when drawing. This is optional but it is recommended that you include a user friendly name so users can identify the type of prefab it is at a glance. If no name is specified the name will be set to the file name of the <PrefabResource> file.
Lines that begin with // are treated as comments and ignored but there are a few exceptions to this rule.
How to define separators [ Top ]
Separators are lines that start with "// separator". Lines that start with "// separator" are used to define how subsequent entries are parsed. Take the following example ...
// separator ,
Codefarts.Unity/Prefabs/Plane, Codefarts.Unity/Textures/2D 2 Poly Plane, Plane
Codefarts.Unity/Prefabs/CornerRamp, Codefarts.Unity/Textures/CornerRamp, CornerRamp
// separator $
Codefarts.Unity/Prefabs/Ramp $ Codefarts.Unity/Textures/Ramp $ Ramp
Codefarts.Unity/Prefabs/InsideCorner $ Codefarts.Unity/Textures/InsideCorner $ InsideCorner
// separator ***
Codefarts.Unity/Prefabs/OutsideCorner *** Codefarts.Unity/Textures/OutsideCorner *** OutsideCorner
Codefarts.Unity/Prefabs/Pyramid *** Codefarts.Unity/Textures/Pyramid *** Pyramid
In the above example "// separator ," defines that subsequent lines should be processed using a comma "," character to separate the prefab, texture and name values. The two following entries Plane and CornerRamp get processed using a comma "," as the separator.
Then "// separator $" is used to change the separator character from a comma "," to a dollar sign "$" and the entries for Ramp and InsideCorner are processed using the dollar sign as a separator.
"// separator ***" Is then defined and used as the separator for OutsideCorner and Pyramid entries.
The true purpose of the "// separator" line is to accommodate any possible prefab name by allowing the user to define what separator string will be used to process entries. The default separator character is a single empty space " ".
How to define categories [ Top ]
Categories are lines that start with "// category". Lines that start with "// category" are used to define what category subsequent entries belong to. Take the following example ...
// Source asset, texture icon, name
// separator ,
// category Category A
Codefarts.Unity/Prefabs/Plane, Codefarts.Unity/Textures/2D 2 Poly Plane, Plane
Codefarts.Unity/Prefabs/CornerRamp, Codefarts.Unity/Textures/CornerRamp, CornerRamp
// category Category B
Codefarts.Unity/Prefabs/Ramp, Codefarts.Unity/Textures/Ramp, Ramp
Codefarts.Unity/Prefabs/Pyramid, Codefarts.Unity/Textures/Pyramid, Pyramid
// category Category C/Sub Category of C
Codefarts.Unity/Prefabs/InsideCorner, Codefarts.Unity/Textures/InsideCorner, InsideCorner
Codefarts.Unity/Prefabs/OutsideCorner, Codefarts.Unity/Textures/OutsideCorner, OutsideCorner
- "Plane" & "CornerRamp" will be included in category "Category A".
- "Ramp" & "Pyramid" will be included in category "Category B".
- "InsideCorner" & "OutsideCorner" will be included in a sub category "Category C/Sub Category of C".
You can define sub categories by including a "/" character in the category name. Note that at least one category must be defined at the top of the file otherwise no prefabs will be added to the quick prefab selection grid.
Understanding the naming convention [ Top ]
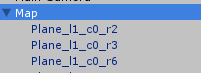
Prefabs that are drawn are added as children under the map. Each part of the name is separated by an underscore "_". The name of the prefab is structured as follows...
- Prefab name.
- Underscore separator.
- "l" character indicating the layer followed by a number indicating what layer the prefab belongs to.
- Underscore separator.
- "c" character indicating the column followed by a number indicating what column the prefab belongs to.
- Underscore separator.
- "r" character indicating the row followed by a number indicating what row the prefab belongs to.
The purpose of this naming convention is to allow for easy identification of children under the map object. With this structured naming convention 3rd party tools can be written to make sense of the prefabs that make up the map.
Settings [ Top ]
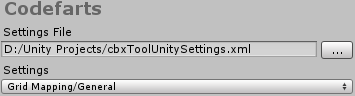
Grid Mapping integrates with a settings section called "Codefarts". The "Settings File" field defines the location of a common *.xml settings file where Grid Mapping will store all of it's settings. Click the "..." button to use a save file dialog and specify the location where you want the settings file to be saved.
By default if you have not yet specified a file, settings will be stored in your "My Documents" folder with the file name "CodefartsSettings.xml". Settings are stored in a xml file because it allows you to copy the settings to other computers that have unity. Or for example after a OS reinstall you can point to the xml settings file and all your saved settings will be restored.
To change settings select a settings category by clicking the "Settings" drop down.
Grid Mapping Settings [ Top ]
Grid Mapping allows you to change various settings that controls how the tool looks and operates. To change the settings click "Edit->Preferences" from the unity menu and select "Codefarts" from the left column of setting categories.
General Settings [ Top ]

-
Map information style
- Old Style (Before version 2) - If selected will display map info as it was before version 2.0.
- Version 2 style - Will display the map information in the new 2.0 style.
- Show map information as foldout - If checked will display the map information inside a foldout control so the user can hide and show the map information in the inspector at will.
- Show inspector tools - If checked tools will be shown in the inspector. Only the "Map Information" foldout will be visible in the inspector.
-
Drawing helpers style
- As check boxes - Displays the drawing helper tools as regular check boxes.
- As buttons - Displays the drawing helper tools as toggle buttons.
- Automatically scale prefabs - If checked the default setting for "Auto Scale" will be checked when a map object is selected.
- Automatically center prefabs - If checked the default setting for "Auto Center" will be checked when a map object is selected.
- Show grid - If checked the default setting for "Grid" will be checked when a map object is selected.
- Show guidelines - If checked the default setting for "Guidelines" will be checked when a map object is selected.
- Show marker - If checked a marker will appear under the mouse pointer when it is hovering over the map.
- Marker Scale - Sets the marker scale that determines the size of the marker relative to the size of the maps CellWidth & CellHeight. The default value is 1.025.
- Default cell width - When a new map is created it's cell width will be set to this value.
- Default cell height - When a new map is created it's cell height will be set to this value.
- Default map columns - When a new map is created it's column count will be set to this value.
- Default map rows - When a new map is created it's row count will be set to this value.
- Default layer depth - When a new map is created it's layer depth will be set to this value.
- Show prefabs in hierarchy - If checked prefabs that are drawn will be visible as children under the map and visible in the hierarchy. If you do not wish to see drawn prefabs in the hierarchy uncheck this.
- Default map name - This will be the name given to newly created maps.
- Hold shift to draw - Requires the user to hold the shift key in order to draw prefabs.
- Hold shift to erase - Requires the user to hold the shift key in order to erase prefabs.
- Hold alt to draw - Requires the user to hold the alt key in order to draw prefabs.
- Hold alt to erase - Requires the user to hold the alt key in order to erase prefabs.
- Hold control to draw - Requires the user to hold the control key in order to draw prefabs.
- Hold control to erase - Requires the user to hold the control key in order to erase prefabs.
- Mouse wheel changes layers - If checked you can use the mouse wheel to change the active layer.
- Hold shift to change layers - If checked you will need to hold the shift key while scrolling the mouse wheel to change layers.
- Hold alt to change layers - If checked you will need to hold the alt key while scrolling the mouse wheel to change layers.
- Hold control to change layers - If checked you will need to hold the control key while scrolling the mouse wheel to change layers.
- Restore last drawing tool - When checked will try to restore the previous drawing tool when the map is selected. Otherwise it will try to make the pencil tool the active drawing tool if it's availible.
-
Rotation control style - Controls how the rotation controls are displayed.
- Hide - Does not show the rotation controls.
- As buttons - Default setting. Will show rotation buttons in the inspector.
- As rotation window - Rotation controls are displayed in a separate dock-able window.
- Orient Rotation Window Vertically - If checked rotation buttons will be displayed vertically in the rotation window, otherwise they are displayed horizontally.
Color Settings [ Top ]
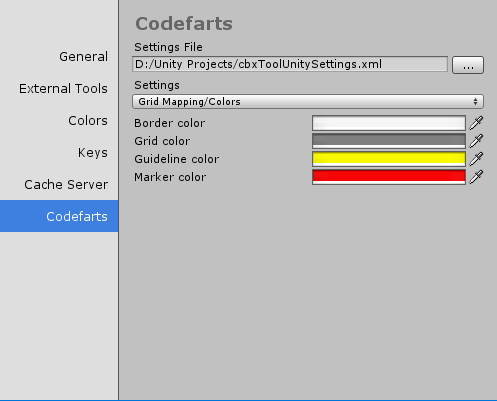
- Border color - Sets the color of the map border.
- Grid color - Sets the color of the map grid.
- Guideline color - Sets the color of the map guideline.
- Marker color - Sets the color of the map marker.
Prefab Settings [ Top ]
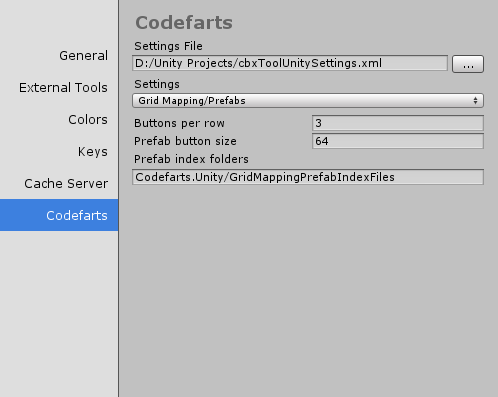
- Buttons per row - Is used to specify how many buttons per row the quick prefab selection grid will have. See the Known Issues section for additional information relating to this setting.
- Prefab button size - Allows you to control how large the prefab buttons are displayed in the inspector.
-
Prefab index folder - Allows you to specify different resource folder locations other then the default prefab index folder location. See the section on Customizing the prefab list.
The default value is "Codefarts.Unity/GridMappingPrefabIndexFiles". You can add more then one folder location my specifying each folder on a separate line.
TIP: It is best if you specify one of your own resource folder(s) that exists outside of the "Codefarts Game" folder so that in the event something changes updates to Grid Mapping will not interfere with your own index files.
Recent Material Settings [ Top ]
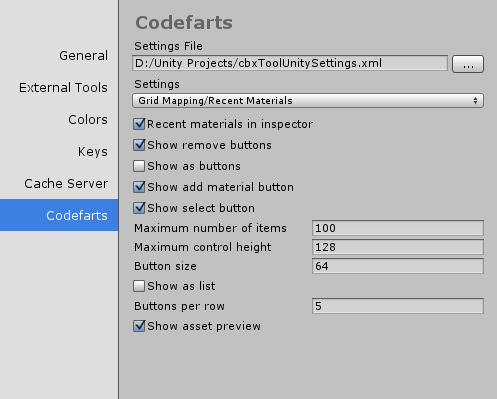
- Recent materials in inspector - If checked the recent materials list will be visible in the inspector.
- Show remove buttons - If checked the remove buttons will be visible in the recent materials list. Remove buttons will only be visible if "Show as list" is also checked.
- Show as buttons - If checked each material in the recent material list will be shown as a button rather then a object selection field.
- Show add material button - If checked the "Add Material" button will be visible above the recent materials list.
- Show select button - If checked will show a "Select" button to the right of items in the recent material list. The select button is only available if "Show as list" is checked and "Show as buttons" is unchecked.
- Maximum number of items - Restricts the number of items that can be in the recent material list by the specified value.
- Maximum control height - Restricts and sets the height of the recent material list to this value.
- Button size - Specifies the size of the buttons. if "Show as list" & "Show as buttons" are checked the height of the buttons in the list will be set to this value.
- Show as list - If checked the recent materials will be shown as a regular list. If unchecked the recent materials will be shown as a grid of buttons.
- Buttons per row - Restricts the number of buttons per row that is displayed when "Show as list" is unchecked.
- Show asset preview - If checked items in the recent materials list will use the same image representation as they appear in the asset selection window. Otherwise the predefined texture will be used. See Customizing the prefab list about how to associate a texture with a prefab.
Recent Prefab Settings [ Top ]
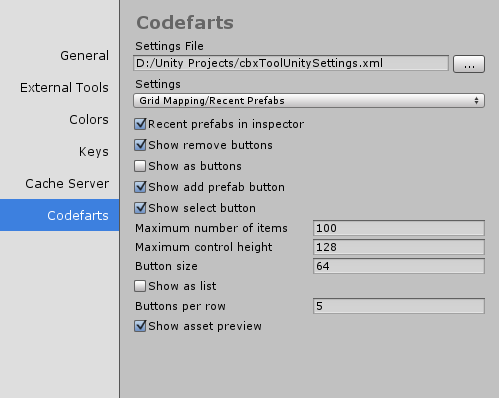
- Recent prefabs in inspector - If checked the recent prefabs list will be visible in the inspector.
- Show remove buttons - If checked the remove buttons will be visible in the recent prefabs list. Remove buttons will only be visible if "Show as list" is also checked.
- Show as buttons - If checked each prefab in the recent prefab list will be shown as a button rather then a object selection field.
- Show add material button - If checked the "Add Prefab" button will be visible above the recent prefabs list.
- Show select button - If checked will show a "Select" button to the right of items in the recent prefab list. The select button is only available if "Show as list" is checked and "Show as buttons" is unchecked.
- Maximum number of items - Restricts the number of items that can be in the recent prefab list by the specified value.
- Maximum control height - Restricts and sets the height of the recent prefab list to this value.
- Button size - Specifies the size of the buttons. if "Show as list" & "Show as buttons" are checked the height of the buttons in the list will be set to this value.
- Show as list - If checked the recent prefabs will be shown as a regular list. If unchecked the recent prefabs will be shown as a grid of buttons.
- Buttons per row - Restricts the number of buttons per row that is displayed when "Show as list" is unchecked.
- Show asset preview - If checked items in the recent prefabs list will use the same image representation as they appear in the asset selection window. Otherwise the predefined texture will be used. See Customizing the prefab list about how to associate a texture with a prefab.
Layer Settings [ Top ]
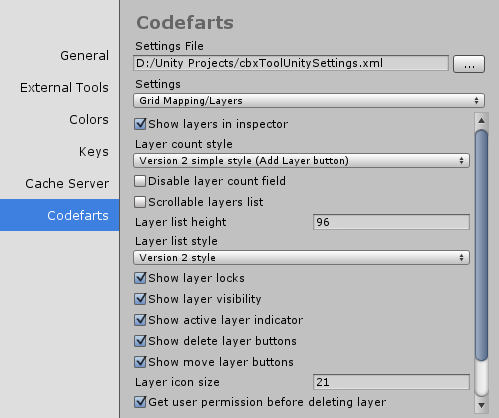
- Show layers in inspector - If checked the layer list will be shown in the inspector.
-
Layer count style
- Old style integer field (Before version 2.0) - If selected the layer count field will be displayed in the inspector as it was before version 2.0
- Version 2 style (Add\Remove buttons) - If selected the layer count field will be displayed above the layer list as it was before version 2 but it will also have add and remove buttons on either side of the field. Clicking the add or remove buttons will add a new layer to the bottom of the list or remove the last layer from the list.
- Version 2 simple style (Add Layer button) - If selected will only show a "Add Layer" button above the list of layers that will allow you to add new layers to the bottom of the layer list.
- Disable layer count field - If checked will prevent the user from typing a layer count into the layer count field. This setting is only designed to work if "Layer count style" is set to "Version 2 style (Add\Remove buttons)".
- Scrollable layer list - If checked the list of layers will be scrollable and the list height will be ignored.
- Layer list height - Specifies the height of the layer list if "Scrollable layer list" is checked.
-
Layer list style
- Old Style (Before version 2.0) - If selected the layers list will appear as it did before version 2.0 as a list of buttons.
- Version 2 style - If selected the layers list will be displayed with the new 2.0 style.
- Show Layer locks - If true lock icons will be shown for each layer indicating whether the layer has been locked or not.
- Show layer visibility - If true icons will be displayed for each layer indicating whether the layer visibility has be turned on or off.
- Show Active Layer indicator - If checked a pencil icon will be displayed along side the currently active layer notifying the user that the layer is the current editing layer.
- Show delete layer buttons - If checked a delete button will be shown for each layer allowing the user to delete that specific layer. NOTE: If there is only one layer in the list then the delete button will not be shown.
- Show move layer buttons - If checked buttons will be shown along side each layer in the layer list that will allow the user to change the layers position within the layer list.
- Layer icon size - Specifies the size of the icons that will be shown in next to each layer in the layer list.
- Get user permission before deleting layer - Check this setting if you want the user to be prompted for confirmation before a layer is deleted.
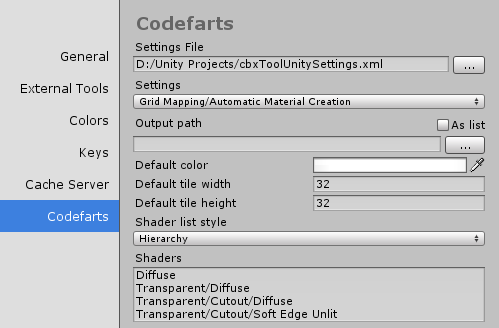
Automatic Material Creation Settings [ Top ]
-
Output Path - Specifies a asset folder location to save the material files in.
- Use the text box to type in a asset folder path by hand.
- Or click the "..." to the right of the text box to use a dialog box to specify a output path.
- Or check the "As list" check box to display the output path as a popup list of asset folders.
- Default color - Specified the default color to use when the Automatic Material Creation window is opened.
- Default tile width - Specifies the default tile width to use when the Automatic Material Creation window is opened.
- Default tile height - Specifies the default tile height to use when the Automatic Material Creation window is opened.
-
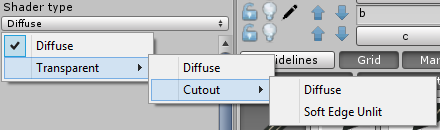
Shader list style - Allows you to define how the list of shader is displayed selecting the "SHader type" popup in the Automatic Material Creation window.
-
Hierarchy
-
Flat
-
- Shaders - Allows you to specify the names of the various shaders to be shown in the Automatic Material Creation window "Shader type" popup. Each shader must be specified on a separate line of the text box.
Drawing Rules Settings [ Top ]
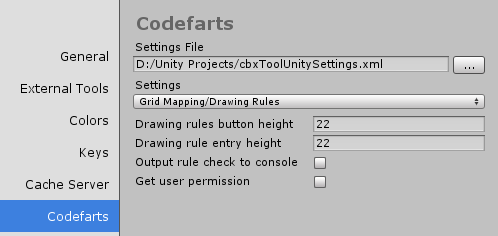
-
Drawing rules button height - Defines the height of the drawing rules button.
- Drawing rule entry height - Defines the height of the buttons are displayed in the drawing rule list.
- Output rule check to console - When checked every time you draw a prefab with the Pencil tool it will report out to the console the rule check information. This can help assist you in trying to figure out why a drawing rule may not be working as expected.
- Get user permission - If checked you will be prompted with warning dialogs when loading or starting a new rule set etc reminding you that you have unsaved changes and those changes will be lost.
Drawing Tools Settings [ Top ]
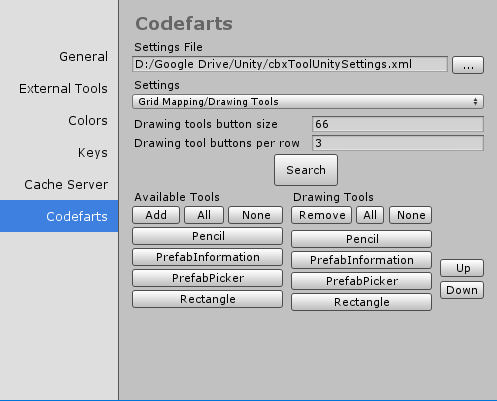
- Drawing tool button size - Allows you to specify how large the drawing tool buttons will appear in the inspector.
- Drawing tool buttons per row - Changes how many button per row will appear in the inspector window.
- Search - Searches for drawing tool that implement the IGridMapEditorTool interface.
-
Available Tools - Lists the available tools that can be added to the "Drawing Tools" list.
- Add - Adds selected item(s) in the "Availible Tools" list to the "Drawing Tools" list.
- All - Selects all the tools in the list.
- None - Clears all selected items in the list.
-
Drawing Tools - Lists the tools that will appear in the inspector.
- Remove - Removes selected item(s) from the "Drawing Tools" list.
- All - Selects all the tools in the list.
- None - Clears all selected items in the list.
- Up - Moves selected item(s) in the "Drawing Tools" list up one position.
- Down - Moves selected item(s) in the "Drawing Tools" list down one position.
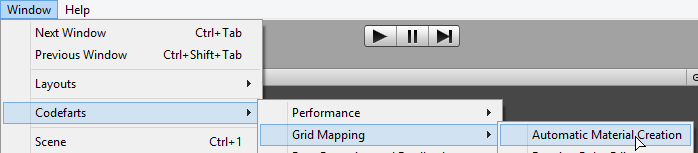
Automatic Material Creation [ Top ]
NOTE: The Automatic Material Creation feature is still in considered to be in beta and may or may not cause unity to hard crash without allowing you to save your work! Use at your own risk or remember to save and save often.
With the Automatic Material Creation window the user does not have to worry about creating materials up front for each tile but instead allows the user to select a tile and start drawing on the map right away.
Internally it keeps track of the selection settings and creates materials for tile each selection. It will also report out to the console how many unique materials it has created based on the user selections.
To show the window click "Window->Codefarts->Grid Mapping->Automatic Material Creation"
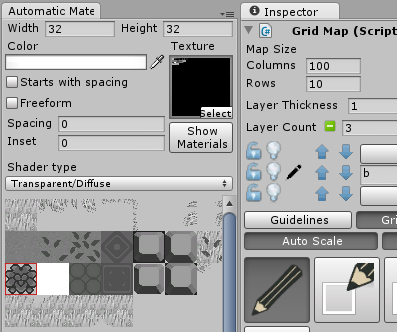
- Width - Allows you to specify the tile width when selecting a tile from the selected texture.
- Height - Allows you to specify the tile height when selecting a tile from the selected texture.
- Color - Allows you to specify a tint color that will alter the colors of the selected tile.
- Starts with spacing - Allows you to specify how many pixels to offset from the top left of the texture to accommodate some tile set textures that start with spacing.
- Free form - This allows you to drawing a selection rectangle that is an odd shape or otherwise does not conform to a standard grid based tile set layout. Read the section on Freeform below.
- Texture - Allows you to select a tile set texture asset.
- Spacing - Defines how many pixels there are between each tile in the tile set.
- Inset - The "Inset" field is intended to fix any pixel bleeding issues with your selection. This value is used to scale the selection rectangle inward slightly so that the color from neighboring tiles do not bleed over. Read the section on Inset below.
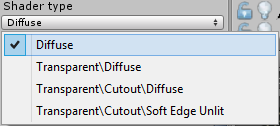
- Shader type - Provides a popup list of shaders. Read the section on Automatic Material Creation Settings for information on how to customize the shaders that appear in the "Shader type" popup.
How to use [ Top ]
- Select a texture containing the tile set you want to create materials for.
- Change width and height to specify the dimensions of the tiles.
- If the tile set texture starts with spacing in the upper left corner then check the "Starts with spacing" check box.
- Set "Spacing" to the number of pixels there are between tiles.
- Select a individual tile by left clicking on it or use the left mouse button and drag a selection rectangle.
- Under "Shader type" Specify a shader type that the material will use.
- Click the color box to select a material color to use.
- Now that you have setup the settings and selected a tile you can draw prefabs using the drawing tools and each prefab will use the material of the tile you selected in the tile set.
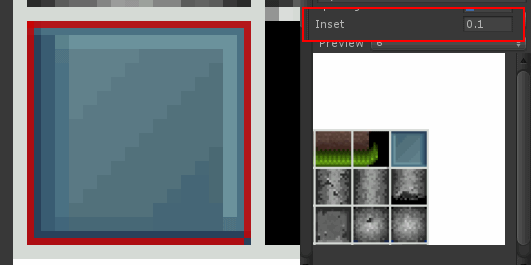
How does "Inset" work? [ Top ]
The "Inset" field is intended to fix any pixel bleeding issues with your selection. This value is used to scale the selection rectangle inward slightly so that the color from neighboring tiles do not bleed over.
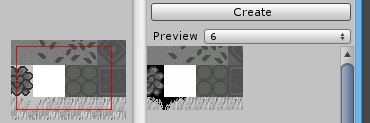
The fallowing 3 images demonstrate how inset works. The tile is surrounded by a two pixel wide border colored in white.
Too large a inset value can cause undesired results. A inset value of 0.1 demonstrates this.
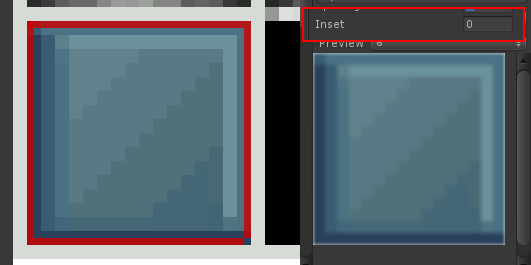
With a inset value of 0.0 the pixels from the white border around the tile bleed over slightly.
With a inset value of 0.0005 the pixels from the white border no longer bleed over.
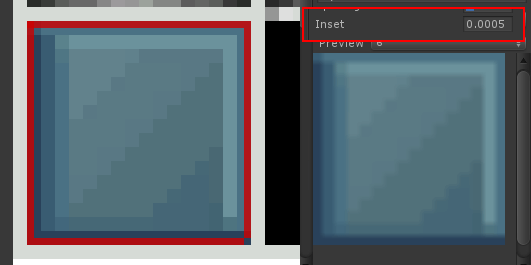
Use a value of 0.0001 as it is generally the best all round value to use.
How does "Free form" work? [ Top ]
By checking the "Free form" check box you can drag a selection rectangle freehand.
This allows you to select a tile or image that is an odd shape or otherwise does not conform to a standard grid based tile set layout.
Drawing Rules Editor [ Top ]
NOTE: The drawing rules editor is still in considered to be in beta and may or may not function as intended.
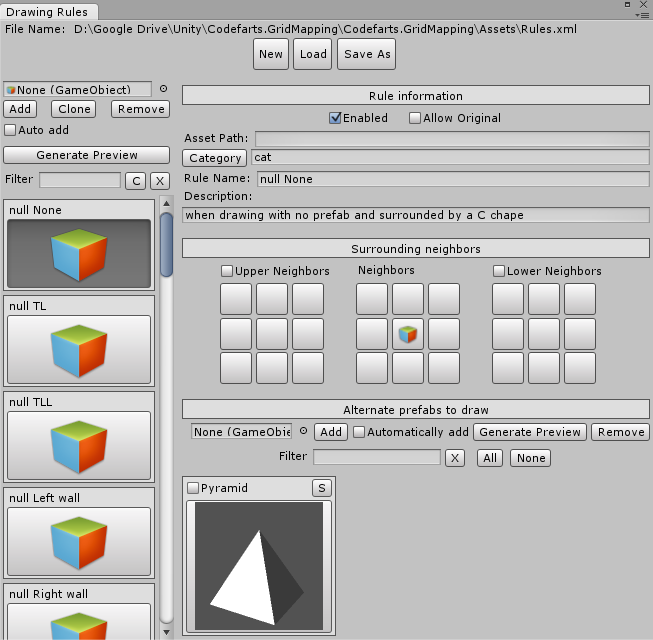
The drawing rules editor allows you to edit xml drawing rule files that can be used when drawing with the pencil tool.
-

Filename - Displays the current working filename that is being edited. If there have been changes to the rule set the file name will be displayed differently indicating that there are unsaved changes made to the rule set.

-
Header buttons

- New - Starts a new rule set. If there have been unsaved changes you may be prompted with a confirmation dialog.
- Load - Loads a xml rule set from disk.
- Save - Save any changes to the current working xml file. If no changes have been made the Save button is not displayed. If there is no active file this will display a dialog asking you to specify a xml file name.
- Save As - Saves the state of the rule set to a new xml file.
-
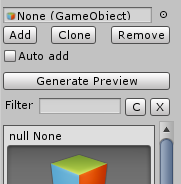
On the left side of the window is the rule list containing all of the rules.
-

Current Prefab - Use this to select a prefab to be added to the rule list.
-
- Add - Adds a new rule to the rule list using the selected prefab as the source of the drawing rule. You can add rules even with no prefab selected.
- Clone - Clones the currently selected rule in the rule list. This button is not visible if there are no rules available to clone.
- Remove - Removes the currently selected rule from the rule list. You may be prompted with a confirmation dialog. This button is not visible if there are no rules available to clone.
-
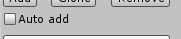
Auto add - If checked new rules will be added automatically every time a prefab is selected in the prefab selection window.
-
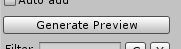
*Generate Preview is not yet implemented.* When implemented it will allow you to generate a preview image for the prefab of the currently selected rules. Unity is not able to generate a preview of some prefabs and this button will allow you to generate a preview for it by other means.
-
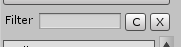
Type some text into the filter filed to filter out any drawing rules that do not match the filter text.
Rules are filtered by there rule name, category, and or prefab name if no rule name is specified.
Click the "C" button to display a hierarchical list of rule categories. Click a category to filter the rules by that category name.
To stop filtering remove any text from the filter text box or click the "X" button.
-
-
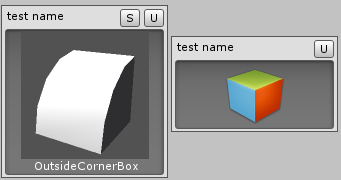
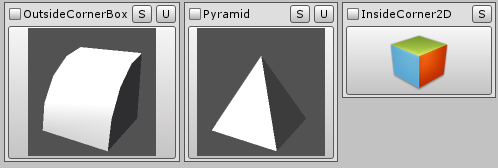
Items in the rule list consist of a header and a preview.
If the rule has been given a name it will appear above the preview at the top left.
If the rule has a prefab associated with it click the "S" button to select and ping the prefab in the unity project window.
The "S" button is not displayed if the rule has no prefab specified.
Click the "U" button at the top right of the rule to change the prefab for the rule to the prefab that is selected in the prefab selection field above the Add/Clone/Remove buttons.
The "U" button is only displayed if the selected prefab and the rules prefab do not match.
If the drawing rules editor is unable to display a preview for the rules prefab it will display a generic multicolored cube. Click the Generate preview button to try and generate a preview for the prefab. If the rule has no prefab specified it will also display the generic multicolored box.
-
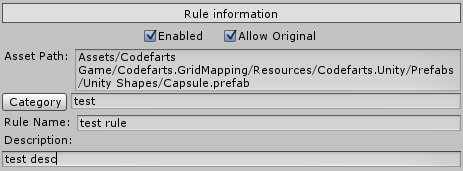
- Enabled - Check this to indicate that the rule should be processed.
- Allow Original - Check this to allow the rule prefab to be considered when drawn.
- Asset Path - If the rule has a prefab associated with it displays the asset path for the rules prefab.
- Category - Click this to toggle between text box and a popup selection. When unchecked you can type in a category name in the text box to help categorize this rule. When checked allows you to select from an existing list of category names used by other rules.
- Rule name - Allows you to give the rule a name.
- Description - Provides a place to provide a more detailed description of what the rule is intended for.
-
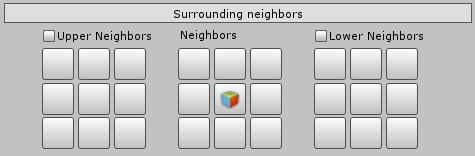
The surrounding neighbors section consists of three 3x3 grids that allow you to specify when the rule is to be applied.
- Upper Neighbors - If checked instructs the rule to check the layer above for the presence of matching neighbor locations.
- Neighbors - Check to see if the surrounding neighbors match the rule.
- Lower Neighbors - If checked instructs the rule to check the layer below for the presence of matching neighbor locations.
-
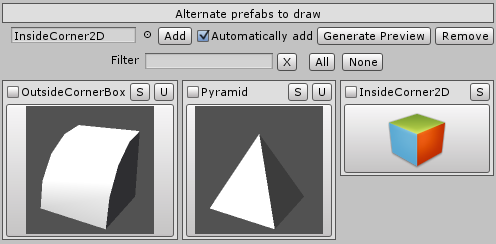
- To the upper left there is a prefab selection control that allows you to select a prefab to add.
-

Add - Click this to add the currently selected prefab to the alternate prefab list.
-
Automatically add - Prefabs will be added automatically every time a prefab is selected in the prefab selection window.
-
Generate preview - *Generate Preview is not yet implemented.* When implemented it will allow you to generate a preview image for the prefab of the currently selected alternate. Unity is not able to generate a preview of some prefabs and this button will allow you to generate a preview for it by other means.
-

Remove - Used to remove any checked alternates from the alternate list.
-
Filter - Allows you to filter the alternate list by typing text in the filter text box. Filter only works against the name of the prefab.
Click the "X" button to the right of the filter text box to clear the filter text box and remove the filter.

All - Checks all of the alternate prefabs in the alternate list.

None - Remove checks from all of the alternate prefabs in the alternate list.
-
Items in the alternate prefab list are displayed similar to the rules in the rule list.
The name of the prefab appears at the top left of the item.
Click the preview image the check or uncheck the alternate prefab.
Click the "S" button to select and ping the prefab in the unity project window.
Click the "U" button at the top right of the alternate prefab to change the prefab to the prefab that is selected in the prefab selection field to the left of the add button.
If the "U" button is only displayed if the selected prefab and the alternate prefab do not match.
If the drawing rules editor is unable to display a preview for the alternate prefab it will display a generic multicolored cube. Click the Generate preview button to try and generate a preview for the prefab. If the rule has no prefab specified it will also display the generic multicolored box.
NOTE: If you started a new rule set and have not yet saved the changes to disk and then unity recompiles your scripts any unsaved rule information will be lost.
*BETA* Map2D [ Top ]
NOTE: Not yet fully implemented.
Map2D will be a pure 2D map creation system intended to provide a pure pixel based tile mapping tool, that will be able to sync with the unity scene. More details will made availible in future updates.
Prefab Index File Generator [ Top ]
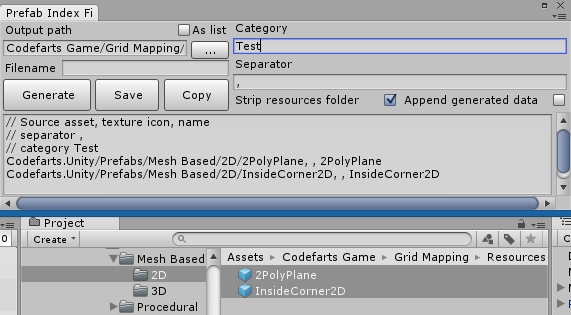
The Prefab Index File Generator tool allows you to generate prefab index file data simply by selecting the prefabs in the project windows and clicking the "Generate" button.
- Output Path - Specifies where in the project you want the output file to be generated.
- As list - Toggle this to change the output path from a text field where you can manually specify a folder by hand, or select from a dropdown list of folders in the project.
- Category - Specify a category name that the selected prefabs will be organized into.
- Separator - Specifyies the separator string that will be used to partition the generated index data.
- Strip Resources Folder - Will detect if the selected prefabs you are generating data for will have there file paths modified. If the selected prefab is nested within a Resources folder the start of the path up to and including the resources folder in that path will be stripped off. For exammple if you select a prefab at this path "Root Folder\Resources\Sub Folder\House.prefab" the generated path will be converted to "Sub Folder\House".
- Append generated data - If checked will append data to any existing in the lower text area preview.
- Filename - Specified the name of the filename that will be saved. NOTE: Be sure to include a .txt file extension or else the file may not be loaded my grid mapping.
- Generate - Generates index data from selected prefabs in the unity project window. You can also select a folder and have all the prefabs in that folder hierarchy included. See notes below.
- Save - Saves the generated prefab index data to the specified output path and filename.
- Copy - Copies the generated index data to the clipboard.
If you select a folder in the unity Project window it will search through the folder heiarchy and include any prefabs it finds. Also the tool is smart enough to detect weather or not the prefab that is being added is nested within a Resources folder and if it is it will trim off that part of the path. This tool also strips off any file extensions because file extentions are not used when loading prefabs via Resources.Load
See the section titled "Customizing the prefab list" for more information about prefab index files.
Bug Reporting [ Top ]
If you find a bug or undesired behavior you can send an email to contact@codefarts.com with a description of your issue.
Or you can use the built in feedback and suggestion reporting tool by selecting "Window->Codefarts->Error Reporting and Feedback".
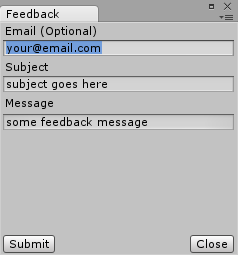
The "Email" field is optional but you could also specify your social media contact info such as Twitter if your submission requires a response from the codefarts team.
Known Issues [ Top ]
- Clicking the rotation buttons to show the preset rotations can lead to the rotations grid not fully displayed requiring the user to scroll down the inspector window to fully see it. This will be addressed in a future work flow update. This has been partially dealt with via the Rotation window setting but still not ideal.
- "Button size" under the recent materials & recent prefabs settings window affects the "Select" button when "Show as list" is checked & "Show as buttons" is unchecked. It's not a bug but it is a minor nuisance. Will probably be tweaked in a later update. This is because the 'Select' button and the 'Show as buttons' setting internally reuse the same button control.*
- There are performance issues with the Rectangle and FillRectangle tools when lots of prefabs are in the scene. I have added performance measurements into the code and identified the locations where performance is suffering but given the source of the performance bottlenecks I may not be able to do much about it when dealing with 50x50 or 100x100 or larger map sizes. I will of course continue to search for alternative solutions, but at this point it's not looking too good. If you plan on using the tool to create large maps greater then 50x50 cells expect 1 to 60 second delays when using Fill Rectangle to fill a large areas. Performance metrics seem to indicate the slow down is the instanciation of all those new prefabs but more investigating is needed. To gain access to the performance window include PERFORMANCE in the Scripting Defined Synbols of the player settings window. New menu items will appear under "Window->Codefarts".
- Layer names are not being saved if you save a scene start a new scene then open the previous scene containing the map the layer names are not restored. Some undo operations also remove all layer names.
- Sometimes you are unable to draw prefabs after unity recompiles scripts even after deselecting and reselecting hte map in the heiarchy window. It's a lingering bug. Only solution I can think of is to create a new map and move the prefabs from the old map over to the new map which should theoretically work.
- Included with v2.3.5 are sprite prefabs. These prefabs need to be drawn with a x rotation of 90, and for some reason don't behave exactly like regular 3D prefabs. There are often times when a sprite does not align it self correctly to the grid or the inspector window does not generate a preview of the sprite. THere are also other times when selecting a sprite from a sprite list in the inspector and drawin that sprite causes the sprite to be drawn black but selecting the gear icon in the sprite list and drawin then drawn the sprite properly.
Concerns [ Top ]
-
My main concern at this point is the layering system as it exists now. It becomes far to cumbersome to create 3D maps that contain more then 3 layers even with mouse wheel scrolling to change the active layer. A solution I am thinking of is similar to how blocks are drawn and erased in the game Minecraft. The Grid Mapping system would essentially determine where you are trying to draw and based on that will automatically set the active drawing layer.
Keep in mind that Grid Mapping was never intended to be a mine craft world creator clone but a quick and easy means of drawing/laying out prefabs onto a grid plane. -
I am hesitant to provide a official API for Grid Mapping at the moment because I have a tendency to heavily refactor sections of code if I feel they are not clean, straight forward, or simple enough. I use visual studio 2013 with various extensions to assist in refactoring my code making it very easy to do so.
I am unaware of how easy or hard it is to refactor large pieces of code in Mono Develop. This can lead to serious issues when it comes to providing a API that developers will be building tools for. So knowing this I may decide to implement an official API later in the development cycle then some people may like. In the mean time Grid Mapping names prefabs using a structured naming convention so it's easy to understand where prefabs are located on the map if people decide to write tools that work with Grid Mapping. - Grid Mapping uses/applies materials to prefabs when drawing. This is not the most optimal system. A more optimal system would be to create one material per tile set texture and change the texture uv coordinates of the prefabs vertexes when being drawn. But this too introduces problems. This is something I'm looking into adding to Grid Mapping either through adding a MonoBehavior or through a plug-in system for Grid Mapping.
Maintaining consistency [ Top ]
I am a strong believer in maintaining the look and functionality of software even when adding more features. When websites like Youtube, Netflix, as well as almost all software programs update there user interface or add new features, they often do not allow the user to revert back to the old style or feature set.
This effectively forces the user to adopt a new visual style for example, even if they hate it they are forced to use it.
That is why I have provided and will continue to provide a number of settings that can be changed to allow the user to incorporate the new features, revert to an older style, or hide undesired features that the user may not have need for.
Version Notes [ Top ]
Items starting with "Completed" are items that have been fully implemented as they were intended
Items starting with "Partial" are items that have only been partially implemented.
v2.4.0+
- To do - Not really a bug but certainly undesirable behavior when drawing some prefabs with rotations x:45 y:90 z:90 prefab seems to dissapear but it's z scale is 0
- To do - With all the various codefarts tools I will be developing for unity look into having a tool window for quickly accessing them.
- To do - Controls in the automatic material creation window need zoom and grab handle features to make selecting tiles more precise if needed.
- To do - If the settings file goes missing and the user tries to re-select the old file it asks if you want to over write the file. Consider modifying that.
- To do - Add change material tool to the drawing buttons. Instead of drawing prefabs it updates the existing prefabs material(s)
- To do - The pyramid mesh when drawn is scaled x:10 y:1 z:10 ? It's an issue with the source mesh.
- To do - Dynamic map resizing
- To do - Clone layer tool
- To do - Layer merge tool
- To do - When loading prefab files if preview texture is missing try to generate preview texture using unity API
- To do - recent materials & apply material should always be visible so you can apply the material to any prefab
- To do - Merge rule set xml files tool by adding button to top of button header
- To do - All hard coded strings in Drawing Rules Editor needs to be re-factored to use the localization system
- To do - Localization system need support for xml localization files
- To do - Need to be able to change the order of rules in the rule list (Drawing rules editor window & inspector)
- To do - Provide mono behaviors that allow you to override/ignore the auto center and auto scale options so users can attach them to the game object/prefab
- To do - Need to do code audit to ensure there are adequate xml & in-line code comments, dead code etc.
- To do - Need to have setting that allows verification whether the mouse is over the layer.
- To do - Need feature that allows each layer to have it's grid and guidelines shown.
- To do - Need feature or tool with ability to specify whether drawing will draw on current layer or multiple layers. For example a fill rectangle tool could be used to draw a solid cube spanning 3 layers drawing a 3x3x3 cube of prefabs.
- To do - Look into using HideFlags.HideAndDontSave and create multiple instances of prefabs ahead of time in order to try and reduce the performance cost associated with drawing large rectangle/fill rectangles. This could be problematic and would require some sort of behavioral /pattern detection system to try and anticipate a user action.
- To do - Need a progress bar with a cancel option for long running draw rectangle operations.
- To do - Need feature when using mouse wheel to zoom in out that the zoom should zoom in/out at the location of the mouse pointer not just the center of the scene view.
- To do - Need to simplify the rotation control grid using DrawControlGrid helper. Provide a setting to roll back to original. Also need to fix scrolling issue with rotation grid not showing up in.
- To do - Modify the rotation grid to a pie chart that allows the user to specify rotations to what ever value they want.
- To do - Double check if there is still issues with the source prefabs having there material set.
- To do - Need editor window for selecting a material. All materials or just materials in a folder and sub folders etc. With the more recent materials selected moved to the top of the list.
- To do - Ability to display a material preview using the materials texture & source rectangle cords. The problem is that unity generates spheres with the material applied but it does not always provide an optimal representation of the material. Especially for tiles.
- To do - When drawing prefabs need to find a way of maintaining the rotation values of the source prefab in the prefab instances that are created from the source.
- To do - May have to consider adding account system to the Codefarts website and email notification system to allow users to download new versions of tools immediately rather then having to go through the asset store. The asset store submission and acceptance process is painfully slow. Or have a build in notification system that notifies the user that there is a new version available for the tool when they open the project etc.
- To do - Sometimes cannot change to different tool (select,rotation,scale) when map and pencil are active. May be a lingering bug.
- To do - Rotation window could use custom grid control rather then SelectionGrid for displaying rotation buttons.
- To do - Rotation window needs ability to remember it's docking position if any.
- To do - Rotations window is still visible when the map is un selected and has no rotation controls in it. The window need to be hidden as well.
- To do - Turn drawing helpers into horizontal button grid with ability to control button size and use icons to represent the helper
- To do - Prefab index file generator need a checkbox that controls weather or not to detect if he path to a prefab in inside a Resources folder.
- To do - Output folder control does not remember selected folder after unity recompiles scripts.
- To do - Currently drawing a prefab only draws at the mid point of a layer. need option to place prefabs that sit above or below the layer.
- To do - Layer names are not being saved if you save a scene start a new scene then open the previous scene containing the map the layer names are not restored.
- To do - Add setting that shows layer index where the current layer pencil icon resides to help identify a layer when there are many layers
- To do - Prefab index file need support for non reousource folder prefabs.
- To do - Ensure procedural mesh behaviors are properly disposing of meshes if they are rebuilt otherwise you end up with vertex buffer objects that are not disposed.
v2.4.0 - ???
- Completed - Implemented new extensible layering system. This allows developers to implement there own way of organizing layers. Includes SimpleLayerManager component that replicates preexisting behavior.
- Completed - Fixed bug where depending on how the layers are displayed it would not prompt the user for confermation before deleting the layer.
- Completed - Implemented new tool specifically for drawing sprites.
v2.3.8 - May 2, 2015
- Completed - Updated code to succssfully compile under Standalone Windows (x86, x86_x64), Standalone Mac OS X (x86, x86_x64, Universal), Linux (x86, x86_x64, x86 + x86_x64 Universal), iOS, Android, WebPlayer, Blackberry, WebGL, Windows Store (8.0, 8.1, Phone 8.1, Universal 8.1), Windows Phone 8. *With no console warnings or errors*
- Completed - Refactored code & moved unity editor specific code to the editor specific code folders and projects to clean up the code and reduce potential compile problems.
v2.3.7 - April 14, 2015
- Completed - Updated materials and assets to use new Unity5 assets and shaders etc.
- Completed - Fixed a bug when opening previously saved scenes and selecting the map object where the internal array lengths would not match.
- Completed - Additional optimizations.
- Completed - Fixed bug in GridMapEditor.OnDisable that would throw null reference exceptions.
- Completed - Fixed bug with DrawRectangle & FillRectangle extension methods where a possible exception could be thrown if the prefab had no Renderer component on it.
- Completed - Minor tweaks to the code to update to unity 5.
- Completed - Updated readme.txt file.
- Completed - Added menu item for opening help documentation "Window/Codefarts/OnlineDocumentation/Grid Mapping"
v2.3.6
- Completed - Fixed a bug when a scene was saved then reopened later users were unable to edit the map.
- Completed - Fixed a bug tracking the state of layer visibilites.
- Completed - Fixed a bug on OSX when a default path was constructed to the CodefartsSettings.xml file would cause errors.
- Completed - Fixed a bug with layer names not being preserved when deleting a layer then performing a undo.
v2.3.5
- Completed - Added new menu category under "Window->Codefarts->Online Documentation" for links to the online documentation.
- Partial - Updated code to use Unity's new Undo system. Some undo operations will cause a loss of layer names. See Known Issues section.
- Completed - Updated code for submitting feedback to use the new website feedback api.
- Completed - Added Prefab Index File Generator Tool.
- Completed - Included copy of cbxTilesSprite which is a clone of cbxTiles but imported as a sprite texture. Also included sprite prefabs and index file.
- Completed - Included PixelPerfectOrthographicCamera in the scripts folder.
- Completed - Removed and replaced obsolete unity code.
- Completed - Updated the code base to use the new codefarts.com feedback api and included SimpleJSON.cs from (http://wiki.unity3d.com/index.php/SimpleJSON) to parse the json result
- Completed - Added additional extension methods for the GridMap object.
- Completed - Removed depreciated calls to LookLikeInspector and LookLikeControls that were giving warnings in the unity console.
- Completed - Fixed issue with layers list when there were less then 4 layers in the list items in the layer list were not spaced properly.
- Completed - Removed redundent CornerRamp[Conflict].prefab. It was a duplicate procedural 3D prefab and it should not have been there.
- Completed - Fixed a bug in the output folder control causing it to expand with a long string but not contract when resized. Seems to be a behavioral difference between the way EditorGUILayout.TextField and GUILayout.TextField layout logic works.
- Completed - Fixed a issue when using the output folder control then selecting a folder using the "..." button the selected folder would not show up in the text field.
- Completed - Fixed minor visual bug with the guidelines not being drawn to the max extent of the map.
- Completed - Fixed an issue that could cause endless errors being dumped into the unity console window if the map object lost its reference to the GridMap component and you tried to set it back.
- Completed - Included sprite prefabs.
- Completed - Moved settings manager and related code files out from the Editor folder so that all game logic can make use of it.
v2.3.4
- Completed - Moved the LocalizationManager outside of the editor folder makng it availible to all game code.
v2.3.3
- Completed - Fixed bug with pencil tool where you could not use the middle mouse button to drag the camera.
- Completed - Fixed bug with pencil tool where prefabs were not auto scaling when auto scaling was turned on.
- Completed - Added Rotation window containing the rotation grid for each X, Y, Z axis.
- Completed - Added/updated general settings with a drop down list that provides the user with different ways for the rotation grids to be displayed.
- Completed - Added new setting under general settings section that controls the orientation (horizontial/vertical) of the rotation grids in the rotations window.
v2.3.2
- Completed - Rearranged location of some menu items to conform to unity asset store submission guidelines. Top level "Codefarts" menu has been moved to "Window->Codefarts".
- Completed - Grid mapping service now provides an event to notify code that a different drawing tool was selected.
- Completed - New settings section for managing and searching for drawing tools, that also allows where tools appear in the drawing tools area and in what order.
- Completed - Grid mapping service now provides an event to notify code that the drawing tool list has changed.
- Completed - Fixed issue with "Drawing tools button size" setting float/int issues.
- Completed - Moved "Drawing tools button size" & "Drawing tool buttons per row" settings from "Grid Mapping/General" to "Grid Mapping/Drawing Tools".
v2.3.1
- Completed - Fixed a bug with the draw rectangle tool where the first prefab would be rotated correctly but the remaining prefabs would not be rotated.
- Completed - Included the 3D block promo scene shown in the unity asset store page.
- Completed - Updated some of the sample scenes.
- Completed - Fixed compilation issue when switching to Web Player platform involving last update time.
- Completed - Performed partial code audit and added more xml documentation and in-line code comments. Also formatted code to conform to default StyleCop settings.
v2.3.0
- Completed - Need to refactor the drawing tools and move them into a interface driven plug-in system so adding new tools is easier & more unit testable and will allow users add in there own tools.
- Completed - Added setting used to determine weather or not to restore the last selected drawing tool when a map is re-selected.
- Completed - Need to optimize pencil tool when dragging while drawing so as not to draw again over the same area.
- Completed - Performance improvements for FillRectangle, EraseFilledRectangle, Rectangle, EraseRectangle, DrawGizmos, & Pencil.
- Completed - Added more performance metrics for identifying performance issues. (Via PERFORMANCE conditional compilation symbol)
- Completed - Fixes bug with gizmos (Grid, marker, Guidelines) not aligning properly with the map if the map position was something other then 0,0,0.
- Completed - Need to change how grid mapping stores current prefab and material selections. It was using instance ID now it uses GUID via assetdatabase.assetpathtoguid etc
- Completed - Added prefab information tool that allows user to click a prefab and get detailed information about it.
- Completed - Need to change how prefabs are created when drawing with rectangles/filled rectangles. The First prefab drawn is the instantiated prefab but subsequent prefabs are instances (clones) and have no prefab connection. This has been fixed.
- Completed - Rules need to be organized by category.
- Completed - Need option with drawing rules editor when displaying the category popup filter. Needs the option to show as hierarchy or flat.
- Completed - Renamed "Drawing Modes" to "Drawing Tools" to more accurately describe the drawing tools.
- Completed - Added ability for a drawing tool to provide additional controls in the inspector under the drawing tool buttons.
- Completed - Fixed rotation issue with some included prefabs when drawing with rectangle the first prefab would not be rotated properly. The rotation value of the source prefab was set to 90.
v2.2.0
- Partial - Implemented drawing rules. NOTE: Still in beta stage as I still have features to add as well as further testing to do.
- Completed - Setting to change drawing rule button height in inspector.
- Completed - Setting to specify the height of each item in the drawing rule list.
- Completed - Fixed undesirable behavior when drawing rectangle or filled rectangle where the marker was not being drawn. The marker now follows the mouse pointer just like the pencil tool.
- Completed - Fixed bug when using the Rectangle or Filled Rectangle tool and the user starts dragging in the scene view but moves the mouse outside the scene view and releases the mouse button. When the user moved the mouse button back into the scene view the tool did not pick up the mouse up event and continued to draw the marker.
- Completed - Fixed undesired behavior with drawing rule editor. When trying to add an alternate prefab with no game object selected the editor mistakenly made the "Save" button appear as though a change occurred.
- Completed - Fixed bug where under certain circumstances when the map was selected rotating the view in unity would become locked and you could only rotate the view.
- Completed - Modified the way the drawing tools are displayed and added settings to control the size of the buttons as well as how many buttons per row to display.
- Completed - Updated the various icons and provided attribution links to them in the documentation.
- Completed - Fixed alignment issue with selected layer not aligning properly.
- Completed - Tool tips now show up when hovering over prefab buttons and draw tools.
- Completed - Fixed bug when drawing with pencil. The Erase method was not using RegisterSceneUndo.
- Completed - Slight performance increase when drawing with pencil.
- Completed - Added setting to change how the "Shader type" popup is displayed for the Automatic Material Creation window.
- Completed - Fixed spelling mistakes and updated documentation.
v2.1.0
Due to some of the name changes you may need to setup your settings again as they will revert to there default values.
- Completed - Changed root menu from "CBX" to "Codefarts".
- Completed - Changed root folder from "CBX Game" to "Codefarts Game".
- Completed - Changes all name space prefixes from "CBX" to "Codefarts". "CBX" was short hand for "Created by: X" the screen name and personal website of Dean Lunz . But now that I have setup an official site for my coding work I have renamed all instances of "CBX" from the project into the more proper "Codefarts" identifier. Documentation has also been updated.
- Completed - Fixed a few spelling mistakes in the documentation.
- Completed - Added additional info to the documentation relating to installation and using the included prefabs.
- Completed - Fixed bug where IndexOutOfRangeException's were being thrown after resizing the map.
- Partial - Added drawing rules editor. Still need to implement the code that applies the actual rule logic while drawing. (Documentation for the rules editor will come in a later update)
- Completed - Fixed bug when drawing with Rectangle, or Filled Rectangle the selection box was not positioned on the current drawing layer.
- Completed - Added settings for changing the size of the drawing tool buttons.
- Completed - Fixed a IndexOutOfRangeException bug where creating a new map attempted to restore the current prefab from a previous map.
- Completed - Fixed bug when drawing certain prefabs with rotations X:0 Y:0 Z:90 that would cause errors to be thrown in the console due to a float equaling Infinity.
- Completed - Fixed alignment issue with the selected layer in the layers list
v2.0.2
- Completed - Fixed issue with procedural 2D shapes not filed under the proper category.
v2.0.1
- Completed - Fixed bug upon first installation of the package. See related post here.
v2.0
- Completed - Fixed bug if build settings were set to WebPlayer. File.GetLastWriteTime was not available under WebPlayer.
- Completed - Complete reshuffling of the code base to make it easier to publish and the code is more organized. The code base now lives in it's own folder under "Codefarts Game\Grid Mapping".
- Completed - All Grid Mapping specific code now lives under the Grid Mapping name space.
- Completed - Added additional prefabs to the quick prefab selection drop down.
- Completed - Fixed issue with the 2D mesh plane prefab. Collider is now properly aligned to the mesh.
- Completed - Temporarily removed the Quick Tools Beta preview from the code base. It will make an reappearance in a future update.
- Completed - Removed dead code from numerous code files.
- Completed - Numerous improvements to the layers system.
- Partial - Automatic Material Creation window is partially implemented but not recommended for production use just yet. It pretty much works as intended but there is no way to save the materials it creates internally as actual unity *.mat files.
- Completed - Ability to hide and show individual layers
- Completed - Have setting to hide show the foldout control for hiding map information
- Completed - Ability to lock a layer so it can not be drawn or erased
- Completed - Ability to change the order of layers in the layer list
- Completed - Ability to delete a specific layer
- Completed - Added 2 additional draw tools Rectangle & FillRectangle
- Completed - Added additional settings for more customization
- Completed - Tile Material Creation, Scene view auto pan, & Hidden Game object tools are no longer part of Grid Mapping but instead have migrated over to a free utility library called "General Tools for unity" available at the Codefarts website.
- Completed - Fixed bug when changing cell size. The map grid did not automatically update.
- Completed - Fixed bug where setting the cell size to a non square value prefabs that were drawn were scaled to the minimum dimensions of the cell.
v1.3.1
- Completed - Removed reliance on conditional compilation symbols "CBXControls", "GridMapping", "QuickTools", "ToolService" & "TileMaterialCreation".
- Completed - Fixed issue with show quick tools menu using Shift+C to display the menu. Would prevent users from typing a capital C in a text box using Shft+C. Ctrl+Shift+C now displays the quick tools popup.
- Partial - Users can now select a tile and draw using the Automatic Material Creation window. Still needs more work.
- Completed - Added additional Unity prefabs without colliders.
v1.3
- Completed - Tile material creation needs a color field so the material color can be specified
- Completed - Tile material creation needs free form selection check box
- Partial - Tile material creation's live preview of what the tile will look like shaded and colored with the material. Implemented but with issues. See the Known Issues section.
- Completed - Tile material creation windows needs ability to ask when overriding if user wants to replace materials in scene with the material that is to be overwritten otherwise material links will be broken
- Completed - Fixed bug in the hidden game object window where the items in the list were displayed with large spaces between items.
- Partial - Added beta feature called Quick Tools. Quick Tools is intended to be a context sensitive popup window containing tools relevant to what you are working on
- Partial - Added beta version of automatic scene view panning that allows you to pan the scene view simply by moving your mouse pointer near the edge of a scene view window. Similar to popular games like Starcraft.
- Completed - Fixed bug where using Grid Mapping in different projects would wipe settings from the central settings file.
- Completed - Added bug reporting & feedback tool
- Partial - First stage implemented. Added Automatic Material Creation window. Will be used as a quick way to select and draw tiles on the map.
v1.2
- Completed - CBXEditorHelpers.toolBarButtonSize need to be replaced with a setting in xml file
- Completed - Need ability to specify in settings weather user need to hold alt ctrl or shift to draw and erase
- Completed - For included prefabs you should have mesh generation ones as well as actual prefab *.fbx ones so the user does not wish to take advantage of mesh generation they can have option to use mesh based prefabs.
- Completed - Should use multiple prefab list files so they can be bundled together and included with prefabs for distribution as a *.unitypackage
- Completed - Recently used prefab list and recently used materials list should not show the name but rather just 'Select'
- Completed - Recently used prefabs and material lists need a setting to say weather or not to show the object selection field or weather to just show a button.
- Completed - Settings for setting the max number of items that a recently used lists can contain.
- Completed - Need to localize all strings for grid mapping using a localization system
- Completed - Have settings to specify the max height of the list of recent materials or prefabs
- Completed - Categorized quick prefab selection
- Completed - Additional prefab shapes for 2D and 3D
- Partial - Ability to edit along different axis. Currently it only supports X/Z axis editing with layers extending into the Y plane. Partial support by granting the ability to rotate the map object and still draw
- Completed - Have option to show recent material & prefab lists displayed as grid of buttons
- Completed - GridMapping DrawMapInfo method uses a cloned skin from a label and makes it white for highlighting sections. You should not do this because it could cause issues if the skin is different.
- Completed - Auto scale does not take into account rotation while drawing so a tall obj drawn with no rotation works fine but a tall object draw with 90 rotation along x causes it not to scale properly IE it does not fit within the cell dimensions. This has been fixed
- Partial - When the map is rotated and user draws the prefabs are not rotated with the map and as such are not drawn in there proper location. This was partially fixed. Prefabs are placed where they should be but positioning the mouse over a grid cell on a map that is rotated is not exact and precise like it is when the map has no rotation. This gets exaggerated when the active layer is beyond 3 layers deep. It works but it is not as accurate as I would like it to be.
- Completed - Full setting customization for changing grid & guideline colors etc
- Completed - Tile material creation window needs setting in settings dialog for 'As list' check box as well as default output path etc
- Completed - Tile material creation should have ability to flip along horizontal and vertical
v1.0 - v1.1
- Initial release
Attribution [ Top ]
-
Author: DesignContest
Attribution link: http://www.designcontest.com
Source: http://www.iconarchive.com/artist/designcontest.html
Drawing tool icons. -
Author: Icojam
Attribution link: http://www.icojam.com
Source: http://www.iconarchive.com/artist/icojam.html
Various icons. -
Author: VisualPharm
Attribution link: http://www.visualpharm.com
Source: http://www.iconarchive.com/show/must-have-icons-by-visualpharm/Globe-icon.html
Blue Globe icon. -
Author: Oxygen Team
Attribution link: http://www.oxygen-icons.org/
Source: http://www.iconarchive.com/show/oxygen-icons-by-oxygen-icons.org/Actions-document-open-remote-icon.html
OpenMap2D icon. -
Author: Icons8
Attribution link: http://icons8.com/
Source: http://www.iconarchive.com/show/windows-8-icons-by-icons8/Maps-Layers-icon.html
Change Layer Manager icon.


