
General Tools for unity
Copyright (c) 2012-2025, CodeFarts
All rights reserved.
contact@codefarts.com
http://www.codefarts.com/
General Tools for unity provides a number of general purpose tools that assist you in performing general tasks within Unity that you would otherwise not be able to do with just the Unity editor tools alone.
Table of Contents
- Downloads
-
First time use
- Hidden Game Objects Window
- Tile Material Creation Window
- Set Material Properties Window
- Mass Asset Rename Window
- *BETA* Scene View Auto Panning Settings
- Immediate Window
- Select by ID Window
- Scene Asset Saver Window
- Set Material Properties Window
- *BETA* Asset Sync Window
- *BETA* Texture Generator Window
- Mesh To Code Window
- Bug Reporting
- Version Notes
Downloads [ Top ]
The core General Tools project files is available for forking at BitBucket at https://bitbucket.org/createdbyx/codefarts.generaltools-project-files
- Version 1.6.1: GeneralToolsR4.zip - May 8, 2013
- Version 1.5: CBXGeneralToolsR3.zip - March 6, 2013
- Version 1.0.1: CBXGeneralToolsR2.zip - February 18, 2013
First time use [ Top ]
Upon installation you may get a popup dialog stating "No settings file exists! Click "Edit->Preferences" and select "Codefarts" to setup a settings file." Click OK and then open the unity preferences dialog by clicking "Edit->Preferences" then select "Codefarts" from the left hand column of categories.
Follow the instructions and click the "..." button to specify the location where to create a new settings file.
This is a one time process, unless the settings file is moved or deleted. If you don't perform this step the tools may not work properly and you will have errors being displayed in the unity console window.
Codefarts.GeneralTool uses a core set of code files found in the "Codefarts\Codefarts.CoreProjectCode" folder that provides a integrated settings system as well as loading and managing localization strings.
Hidden Game Objects Window [ Top ]
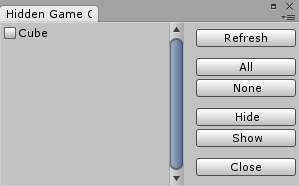
The hidden game objects window allows you to search for scene objects that are hidden from the hierarchy window. You can open the window by clicking "Codefarts->General Utilities->Hidden Game Objects" from the unity menus.
- Refresh - Refreshes the list of hidden game objects.
- All - Checks all the check boxes in the list.
- None - Removes checks from all the check boxes in the list.
- Hide - Will hide any selected scene objects from the hierarchy.
- Show - Makes all the checked items in the list visible in the hierarchy window again.
- Close - Closes the hidden game objects window.
Known Issues [ Top ]
- Hiding a top level object in the hierarchy may not always work and the object will still be visible in the hierarchy but not selectable in a scene view. This may be a unity limitation, or possibly a bug. More investimugations are needed. :)
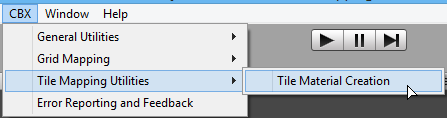
Tile Material Creation Window [ Top ]
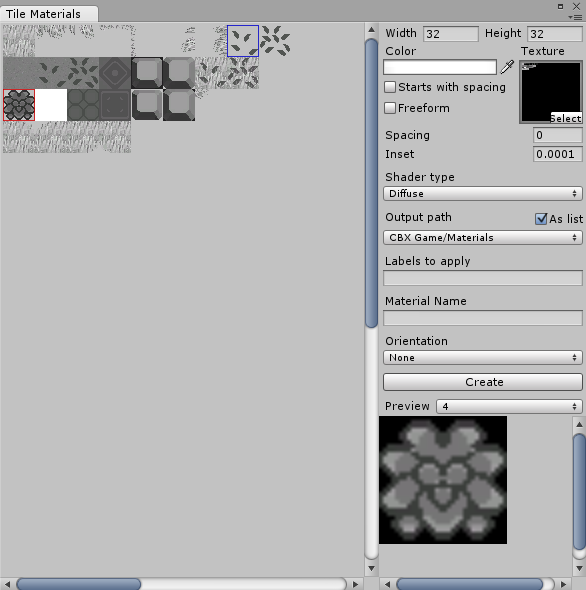
The tile material creation window allows you to create materials for one or more selected tiles. To open the window click "Codefarts->Tile Mapping Utilities->Tile Material Creation".
How to use [ Top ]
- Select a texture containing the tiles you want to create materials for.
- Change width and height to specify the dimensions of the tiles.
- If the tile set texture starts with spacing in the upper left corner then check the "Starts with spacing" check box.
- Set "Spacing" to the number of pixels there are between tiles.
- Select a individual tile by left clicking on it or use the left mouse button and drag a selection rectangle.
- Specify an output path where the material will be created or click the "Set" button to use a select folder dialog. Checking the "As list" check box will allow you to select from a popup of asset folders.
- Under "Shader type" Specify a shader type that the material will use.
- Specify any labels you wish to be applied to the material in the "Labels to apply" field.
- You can also choose to flip the tile horizontally or vertically or both under the "Orientation" drop down.
- Click the color box to select a material color to use.
- Click the "Create" button to create the material.
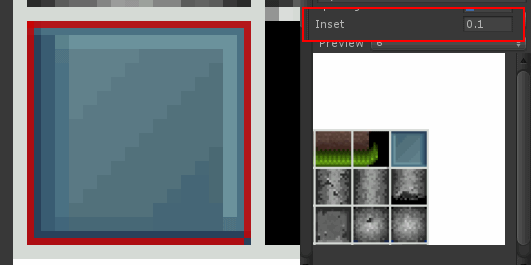
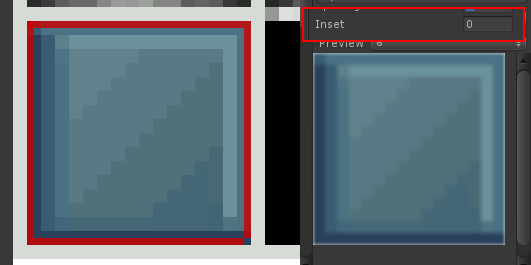
How does "Inset" work? [ Top ]
The "Inset" field is intended to fix any pixel bleeding issues with your selection. This value is used to scale the selection rectangle inward slightly so that the color from neighboring tiles do not bleed over.
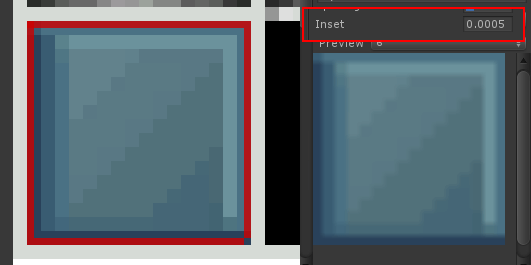
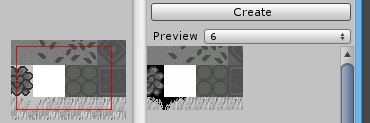
The fallowing 3 images demonstrate how inset works. The tile is surrounded by a two pixel wide border colored in white.
Too large a inset value can cause undesired results. A inset value of 0.1 demonstrates this.
With a inset value of 0.0 the pixels from the white border around the tile bleed over slightly.
With a inset value of 0.0005 the pixels from the white border no longer bleed over.
Use a value of 0.0001 as it is generally the best all round value to use.
How does "Freeform" work? [ Top ]
By checking the "Freeform" check box you can drag a selection rectangle freehand.
This allows you to select a tile or image that is an odd shape or otherwise does not conform to a standard grid based tile set layout.
Settings [ Top ]
Settings are available under the "Edit->Preferences" menu. On the side bar select "Codefarts" and select "Tile Mapping Utilities/Tile Material Creation".
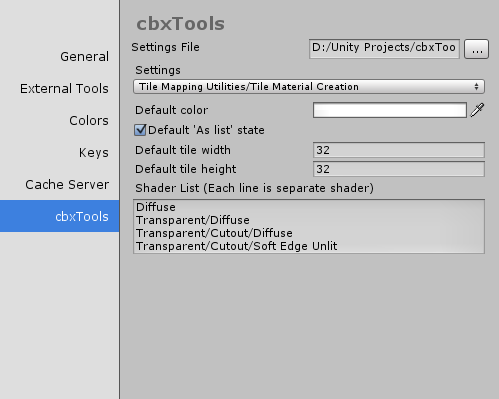
- Default Color - Sets the default color that will be displayed when the tile material creation window is opened.
- Default "As List" state - Sets the default value of the "As List" check box when the window is opened.
- Default Tile Width - Sets the default tile width when the tile material creation window is opened.
- Default Tile Height - Sets the default tile height when the tile material creation window is opened.
- Shader List - Provides a text box where you can customize the list of available shaders that will be selectable in the "Shader type" popup. Each Line is a separate shader. Use forward slashes "/" to specify categories.
Known Issues [ Top ]
-
The selection preview in the lower right can end up drawing outside the bounds of the preview space if you set the preview zoom to high.
This is a known issue and at this time it is unknown if it is a unity bug or not.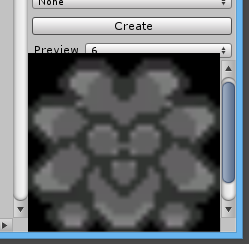
- Other issues involve the selection preview not being rendered properly depending on what shader you select etc.
Future list of features [ Top ]
For the purposes of transparency here are a list of features that may or may not be coming in subsequent updates listed in no particular order.
- Needs ability to edit an existing material or edit the selected material etc
- Needs ability to zoom main preview
- Needs ability right mouse drag to set rectangle size because precisely selecting with just left button is too hard
- Needs drag handles around selection rectangle for easier rectangle placement
- Need x/y offset value allowing for selecting tiles that are not perfectly aligned with the 0,0 origin of the texture
- Need more settings to control default values.
- TileSelectionControl needs checkerboard background so transparency can be made more apparent
Set Material Properties Window [ Top ]
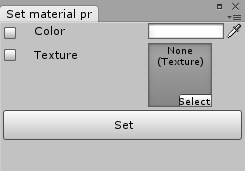
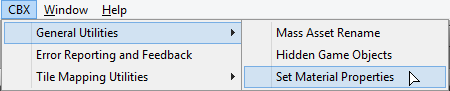
The Set Material Properties window is a simple tool that allows you to select material assets in the project window and change there color or main texture. To open the window click "Codefarts->General Utilities->Set Material Properties".
How to use [ Top ]
- If you wish to set the material color check the "Color" check box and select a color.
- If you want to change the main texture of the material check the "Texture" check box and select a texture asset.
- Next select one or more material assets from the unity project window that you want to change and click the "Set" button.
- If you make a mistake you can use Ctrl+Z to undo the changes.
NOTE: If your selection includes a folder the utility will search for any materials within that folder and set there properties as well so be careful.
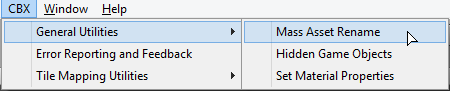
Mass Asset Rename Window [ Top ]
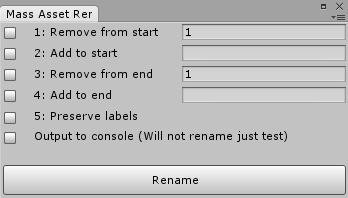
The Mass Asset Rename Window is a simple tool that allows you to select one or more assets in the project window and change there asset file names.
How to use [ Top ]
- To remove characters from the start of the asset file name(s) check "1: Remove from start" and specify a character count.
- To add characters to the beginning of the asset file name(s) check "2: Add to start" and provide a value that will be added to the start of the asset file name(s).
- To remove characters from the end of the asset file name(s) check "3: Remove from end" and specify a character count.
- To add characters to the end of the asset file name(s) check "4: Add to end" and provide a value that will be added to the start of the asset file name(s).
- If you wish to preserve any labels that the asset file may have check the "5: Preserve labels" check box.
- If you simple want to test renaming the files you can check "Output to console" and instead of renaming the selected asset files it will report out to the console the files that will be renamed.
- Click the "Rename" button to rename your asset file(s).
NOTE: There is no undo support for renaming asset file(s) so be careful!
Scene View Auto Pan Settings [ Top ]
NOTE: The Scene View Auto Pan feature is still in beta and if it is enabled it may cause unity to hard crash without allowing you to save your work!
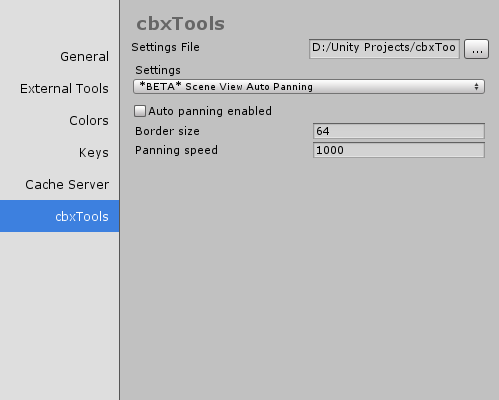
- Auto panning enabled - If checked will allow you to pan the camera in a scene view window simply by moving your mouse to the edges of the window.
- Border size - Defines how close to the edge of the scene view window you mouse pointer needs to be before auto panning is engaged.
- Panning speed - Defines the speed at which the scene view camera will move when panning.
Immediate Window [ Top ]
The Immediate window allows you to type C# code in the unity editor and run that code.
You can open the window under "Codefarts->General Utilities->Immediate Window".
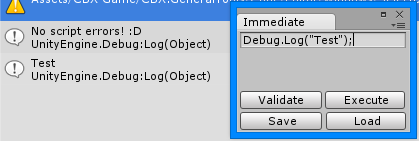
- Type C# code into the text box.
- Click Validate to check if your code was typed out right.
- Click Execute to execute your code.
- Click the save button to save the code to a *.txt file.
- Click Load to load code from a file.
I'm planing on adding the ability to select from a list of recent code snips for faster search and execution of code snippets.
Select by ID Window [ Top ]
The Select by ID window allows you to type in multiple Id's and select them.
You can open the window under "Codefarts->General Utilities->Select by ID".
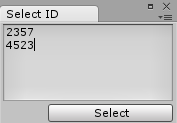
- Type game object ID's on each line of the text area.
- Click the Select button to select the game objects by there id.
Still not sure what use this could have but I have included it anyway.
Scene Asset Saver Window [ Top ]
The Scene Asset Saver window allows you to save materials in a scene that may been generated through code and have not been saved as a *.mat asset file.
You can open the window under "Codefarts->General Utilities->Scene Asset Saver".
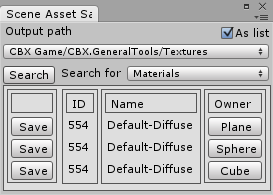
-
Specify an output path where the material file will be saved to.
- Check the "As List" check box to navigate your asset folders using a popup list. "<root>" represents the root assets folder.
- Click the Search button to find references to materials in the scene that have not been saved to disk.
- Click the Save button on the left to save that material to disk.
- You can select and bring into focus a game object by clicking the buttons on the right hand column containing the name of the game objects. If a game object has no name the button text will be "<no name>".
Asset Sync Window [ Top ]
The Asset Sync window allows you to sync external asset files into your unity project with the click of the button.
You can open the window under "Codefarts->General Utilities->Asset Sync".
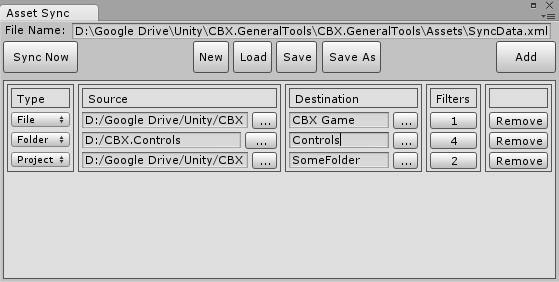
- Click the Add button to add a new sync entry. Click the remove button on the far right column to remove a entry.
-
Under the Type column you can change the type of sync that will occur.
- File - Copies a individual file into the project.
- Folder - Copies the contents of the source folder and all sub folders into the project.
- Project - Parses the *.csproj or *.unityproj file and copies it's assets over to the project.
- Click the New button to clear and remove all entries and start a new sync list.
-
Use the Load, Save & Save As buttons to save changes or load sync entries from disk. After saving or loading the filename appears at the top of the window indicating what file your are editing.
- If the Save button is not visible it is because there have been no changes to the entries in the list since the file was last saved or loaded.
-
Click the Sync Now to perform the asset sync and copy all specified assets into the project.
- Be aware that if a asset already exists in the project the asset will be overwritten!
NOTE: The "Project" sync type option is currently not implemented.
Filters [ Top ]
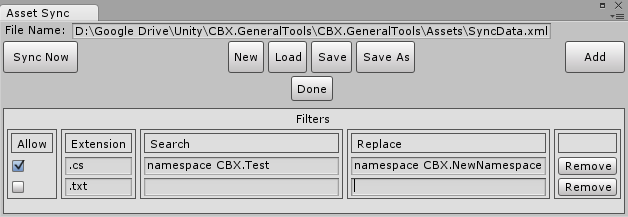
So can specify filtering rules under the Filter column by clicking the filter button for a sync entry. The number displayed in the filter button shows how many filters have been setup for that specific sync entry.
- Click the "Add" button to add a new filtering rule
- Check the "Allow" check box to allow the file matching the extension to be copied. If not checked the file matching the extension will not be copied.
- Specify a single file extension that the filtering rule will be applied to.
- If the file extension is a code file (*.cs, *.js, *.boo) you can optionally specify search and replace strings to perform search and replace functions on the content of the file.
- Click the "Done" button when you are done setting up filtering.
NOTE: That filtering is only applied to a single sync entry. So if the sync type is set to File then filtering will act only on that file. If the sync type is a folder or project sync then filtering for the folder/project files will be applied to all files that are copied from that folder/project.
Future Features [ Top ]
- Need to implement project file sync type.
- Need feature so that code files that are imported into the project can be placed into a desired name space.
- Need filtering mechanism for file and folder names.
- Strings need to be localized.
- Maybe have prompt if a existing asset file is about to be overwritten, or provide a summary of all the assets that will be over written where the user can allow or deny specific assets. Might also want the user to be able to specify to remember the action so as not to have to prompt the user again.
- Have an automatic sync ability that detects when a source has changed or is different from the asset in the project and have it automatically synced without needing the user to invoke the sync manually.
- Sync & Filter tables need a clone button to clone an entry.
- Need to provide global filtering rules.
- Need to change text, and code asset editing settings to a button that detect if the conditional compilation settigns a are already enabled or not and toggle them on or off.
*BETA* Texture Generator Window [ Top ]
The Texture Generator window allows you to create measurement textures. Useful for creating custom textures tailored how you need them.
This tools is currently in beta stages and is only partly implemented. There is currently no documentation for it. I'm working on it ;)
Mesh to code Window [ Top ]

The Mesh To Code window allows you to convert a mesh into a C# method that can generate he mesh procedurally.
To open the window click the menu "Codefarts->General Utilities->Mesh To Code".
- Select a prefab to convert
- If you with to try and optimize the mesh check the Optimize check box
- Check the "Round vertexes" & "Round normals" check boxes and specify how many decimal place to round the values to.
- Click the "Generate" button to generate the code.
- Click the "Copy to clipboard" button to copy the generated C# code to the clipboard.
NOTE: Copy to clipboard has not been tested under a mac environment.
NOTE: This utility is meant for low polygon mesh conversions. If the generated code appears to only be partially generated in the preview text area you may still be able to click the copy to clipboard button and copy the entire code into the clipboard. This is a known issue.
Bug Reporting [ Top ]
If you find a bug or undesired behavior you can send an email to contact@codefarts.com with a description of your issue.
Or you can use the built in feedback and suggestion reporting tool by selecting "Window->Codefarts->Error Reporting and Feedback".
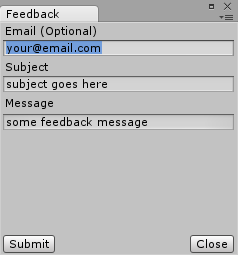
The "Email" field is optional but you could also specify your social media contact info such as Twitter if your submission requires a response from the codefarts team.
Version Notes [ Top ]
Items starting with "Completed" are items that have been fully implemented as they were intended
Items starting with "Partial" are items that have only been partially implemented.
v1.7.0
- Completed - Included the IEnumerableExtensionWithProgressBar from http://wiki.unity3d.com/index.php/WithProgressBar
- Completed - Fixed but in output path control
- Completed - Updated feedback window to use new feedback api
- Completed - Updated editor callback service to check if already running callbacks and prevent new callback from being added during this time
- Completed - Added setting for the MakeReadableTextureProcessor class. Specifically you an noe control what text is added on to the generated texture. The default is still "_NewFileNameTempPewpzIRReadableTex" if there is no setting present in the settings file.
v1.6.2
- Completed - Rearranged location of some menu items to conform to unity asset store submission guidelines. Top level "Codefarts" menu has been moved to "Window->Codefarts".
- Completed - Moved the LocalizationManager outside of the editor folder makng it availible to all game code.
v1.6.1
- Completed - Updated CoreProjectCode to sync with other Codefarts projects.
- Completed - Changed folder "Codefarts.CoreProjectCode" to "CoreProjectCore" removing the redundant "Codefarts" prefix.
- Completed - Changed folder "Codefarts.GeneralTools" to "GeneralTools" removing the redundant "Codefarts" prefix.
v1.6
- Completed - Renamed CBX.GeneralTools to "General Tools for unity"
- Completed - Changed root menu from CBX to Codefarts.
- Completed - Added filtering rules to the asset sync tool.
- Completed - Added Mesh to code window.
- Completed - Changes all name space prefixes from "CBX" to "Codefarts". "CBX" was short hand for "Created by: X" the screen name and personal website of Dean Lunz . But now that I have setup an official site for my coding work I have renamed all instances of "CBX" from the project into the more proper "Codefarts" identifier. Documentation has also been updated.
v1.5
- Completed - Added Immediate window to allow developers to type C# code in the unity editor and run it.
- Completed - Added Select by ID window.
- Completed - Added Scene Asset Saver window that can save materials in the scene that have no associated asset file saved to disk.
- Completed - Set Material Properties Window for setting color and main texture of multiple selected material asset files.
- Completed - Asset Sync Window for setting up asset file(s) synchronization at the click of a button.
v1.0.1
- Completed - Fixed bug upon first installation of the package. See related post here.
Version 1.0
- Initial release


